Introduction
CSS specificity is one of the most important concepts in web development, yet many developers don’t fully understand how it works. Today, I’ll explain why it matters and why you should be familiar with it.
I don’t know about you, but I can bet that many developers reading this article might be encountering this concept for the first time. If that’s you, don’t worry — I was once in the same position 😀.
I’ll cover this topic in depth — from what it is, to why it matters, to how it works — using plenty of examples and clear diagrams. Let’s dive right in.
What Specificity
Specificity in CSS refers to the precision of styling for a given element. For example, an element is targeted for styling using multiple values such as tag, id, class, and inline-styling. CSS uses an algorithm to determine which selector takes precedence. If you are feeling confused, check out the example below; it will help clarify my point.
h1 {
 color: red;
}

.h1-class {
color: green;
}

#h2-Id {
color: blue;
}
Have you seen how I have applied styling to <h1> text using different methods? Do you have any idea which targeted values’ CSS should be considered? There is a significant conflict, isn’t there? Hmm, the same element but multiple styles 😀. That can be quite confusing. This is where specificity comes in to solve the problem. CSS recognizes all these elements based on their specificity scores. Indeed, tags, ids, classes, and inline-styling have their specific scores and levels of specificity that CSS uses to determine the styling.
Lacking knowledge of this concept can lead to hours of debugging in the situation I mentioned earlier; in larger projects, developers often face this issue where styling doesn’t work due to conflicting CSS. Always consider the high specificity score that already exists in the code.
I have experienced this in my recent job when I had the opportunity to work with an old legacy codebase. These bugs can be truly frustrating 😤. However, I bet you can avoid this issue after reading this article.
How Specificity Works
Specificity is calculated based on the types of selectors used in the CSS rules. Each type of selector has a different weight, and the total specificity is determined by adding these weights together. You might be wondering: Why do I need to know about CSS specificity? Don’t worry—I’ll explain it in detail. Take a look at the example below:
h1 {
color: red;
}

h1 {
color: green;
}
Now, what do you think the color of the <h1> text will be? Perhaps you haven’t tested this before. Take a look at the output below.
As you can see, the <h1> text appears green. But why?
The reason is straightforward: when multiple CSS rules target the same element with the same specificity, the one that comes later in the code overrides the earlier one. This is because CSS is read from top to bottom.
I hope you now understand how CSS behaves, especially if you didn’t have this knowledge before, because this concept is essential to grasp. Now, let’s move on to the main question: What will be the color of the <h1> text in the following example?
.h1-class {
color: green;
}

h1 {
color: red;
}
And here’s the corresponding HTML:
<h1 class="h1-class">Hello World</h1>
You can check the output below:
Have you noticed that the output is green? You might initially expect the color to be red, thinking that CSS rules are applied from top to bottom and that the later rule should override the earlier one. However, that’s not how CSS prioritization works.
In this case, the output being green is actually correct, because of CSS specificity. A class selector (.h1-class) has higher specificity than a type selector (h1). Since both rules target the same element, the one with higher specificity takes precedence—regardless of order in the stylesheet.
Because the class selector (.h1-class) has higher specificity, it overrides any lower-specificity rules, even if those rules appear later in the stylesheet, as in the example above.
Did you notice the twist? Now imagine you're working with a large codebase and need to manage the styling of a complex website. Even with experience, you may find that some styles don't seem to apply correctly. This often happens due to a lack of understanding of CSS specificity.
Believe it or not, I’ve encountered this exact issue while working on a large, older project. Styles wouldn't apply as expected, not because they were written incorrectly, but because more specific selectors were already targeting the same elements.
Take a look at the example below. I’ve tried to replicate a similar issue to help you understand the concept. While it may not fully capture the complexity of a real-world case, it should give you a feel for the importance of specificity and how it can impact your work.
CSS Specificity Challenge
The <h2> below is red because of a highly specific selector:
#h2-id {
    color: red;
}
Your Goal
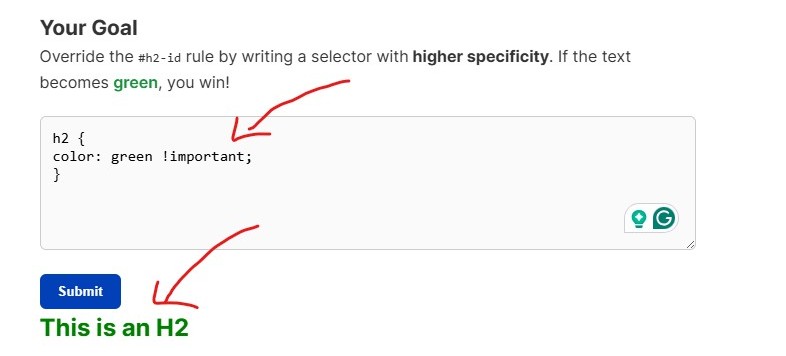
Override the #h2-id rule by writing a selector with higher specificity. If the text becomes green, you win!
This is an H2
Did you see? I have styled <h2> by targeting #h2-id rule, which has high specificity, so if you have to change the color of <h2> from Red to Green. How would you do it? Don’t worry if you couldn’t do this. This will help you realize how much you know about this topic and its worth.
Try to override the #h2-id rule by writing a CSS selector with higher specificity in the textarea above, then click Submit. If, after submitting, the <h2> text changes from red to green, it means you have succeeded. Otherwise, your approach didn't have enough specificity.
Note: Using the same ID selector (#h2-id) won't work because your rule will be added above the existing one, not below. CSS applies the last rule with the highest specificity, so simply repeating #h2-id may not be effective unless it's written after the existing rule in the stylesheet, which you cannot guarantee in this case.
Have you succeeded in solving this issue? If not, then the answer is below:
This rule combines a tag selector (h2) with an ID selector (#h2-id). While h2 alone has lower specificity than #h2-id, the combination (h2#h2-id) has higher specificity than just the ID alone, which is why this works.
We'll discuss specificity scores for different selectors soon, so you can fully understand how this works. Now that you’ve seen the power of selector specificity, let’s move on to the psychology behind CSS design.
How Specificity Works
As we know, each CSS selector has a specificity level or score, which determines how styles are applied when there are conflicting rules. CSS uses this specificity score to decide which selector's styles should take precedence.
Until now, I haven’t explained the exact specificity levels for different selectors, but I’m about to walk you through them in detail. Check out the image below. I’ve designed it to help make things clearer.
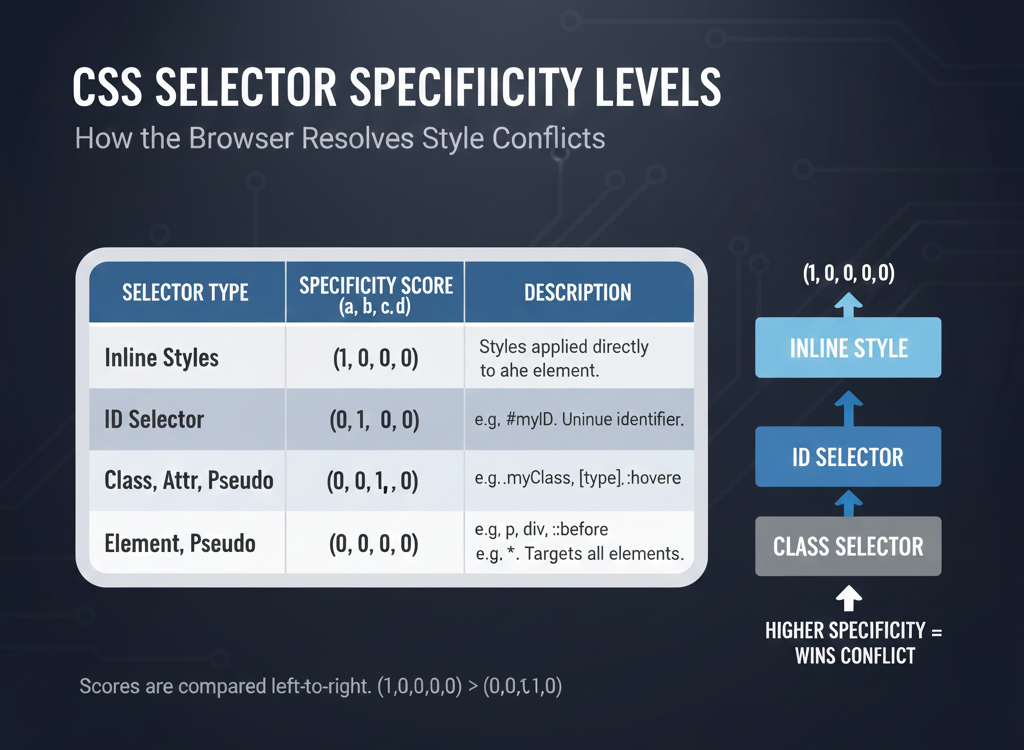
Have you noticed how each selector in CSS has a different specificity score? This score helps the browser resolve conflicts between styles. A selector with a higher specificity will override styles from one with a lower score. For example, a specificity value of (1,0,0,0) is considered higher than (0,1,0,0).
You might be wondering: Is there a way to check the specificity score? Yes, browsers offer developer tools (like the Inspect tool) that allow you to examine how styles are applied and view specificity in action. Watch the short clip below to see how this works.
Have you learned how to check specificity? The text with a line-through style represents CSS rules that have been overridden by more specific selectors.
Now you should have a good idea of how to track specificity, which will be quite helpful later in this article. Let’s now look at a few examples to reinforce the concept.
You may recall that I previously gave you a task related to a specificity issue. In that exercise, you had to override the more specific #h2-id selector to change the <h2> color from red to green, without using inline styles or reusing the same #h2-id selector. Below is the solution I mentioned earlier, although I didn’t explain why the h2#h2-id selector has higher specificity than #h2-id. Let's understand this using the rules of CSS specificity:
According to the specificity rules:
- #h2-id has a specificity of 0,1,0,0 (one ID selector).
- h2#h2-id has a specificity of 0,1,0,1 because it includes:
- one ID selector (#h2-id) → 0,1,0,0 and one type selector (h2) → 0,0,0,1
When combined, the specificity becomes 0,1,0,1 which is higher than 0,1,0,0. Therefore,h2#h2-id overrides the previous declaration even though both use the same ID.
Using Important!
The !important declaration forcefully overrides all other selectors and rules, even if they have higher specificity. It should only be used when a style must override others that are not easily overridden by specificity alone.
Although CSS specificity is typically represented by four values (e.g., 0,0,0,0), these represent inline styles, IDs, classes (including attributes and pseudo-classes), and elements (including pseudo-elements), the !important declaration is considered to be outside the specificity hierarchy. However, some sources informally represent it with a fifth level, giving it an effective specificity like 1,0,0,0,0.
In this example, the text will be blue, not red, because !important overrides the more specific #h2-id selector.
Have you noticed how !important overrides all selectors and rules forcefully even though h2 alone has lower specificity than #h2-id? You can test this yourself in the interactive example above.
Although using !important frequently is not recommended — since it’s difficult to override once applied — understanding it is crucial. In difficult situations, it can sometimes be a game-changer.